|
Search 650Rider.com and XS650.com using Google!
|
 | |
|
|
|
| xs650 > > Motorcycle Systems > > Fuel > > Fuel bowl question |
|---|
| Author |
Message |
kenb
Full Member

Joined: May 11, 2008
Posts: 119
Location: Flamborough, ON, Canada
|
 Posted: May 29, 2008, 5:33 pm Post subject: Fuel bowl question Posted: May 29, 2008, 5:33 pm Post subject: Fuel bowl question |
|
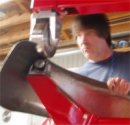
Hi Guys,
I've spent the best part of the afternoon tearing apart my carbs, as I figured that they could use it after sitting in a barn for 8 years. Wow, what a mess it was in there, pretty much everything was welded together with hardened varnish, and I went through 2 cans of carb cleaner getting things moving again and all of the internal passageways cleaned out. Things are looking much better in there now, but there is a set of holes on both fuel bowls that have me scratching my head right now.
First of all, I'm not too sure which type of carbs these are, so maybe somebody could straighten me out on that. The bike is supposed to be a 78 according to the ownership and what the seller told me, but the VIN number and the folks at the Yamaha parts desk are suggesting this bike is actually a 79.
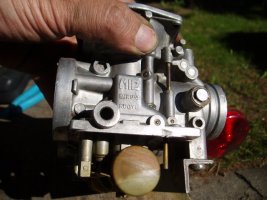
The carbs have the following markings: MIG MIKUNI KOGYO as seen in the image below, with the only other markings being the number 135 on the throttle butterfly plates.
y main question concerns the holes in the fuel bowls marked with the red arrows in the picture below. These holes are "absolutely blocked", so absolutely blocked (on both fuel bowls) that I beginning to question whether they were ever drilled out completely and communicating with each other in the first place. Common sense would suggest that they were, since the castings have bosses on the outside that were obviously provided for this, but I'm wondering if the castings were made this way to provide for several different models that did not all utilize this feature.
I'd appreciate it if you could have a look at the picture with the red arrows and tell me what you think.
Thanks folks.
Ken
| Description: |
|
| Filesize: |
58.27 KB |
| Viewed: |
215 Time(s) |
|
| Description: |
|
| Filesize: |
67.6 KB |
| Viewed: |
210 Time(s) |

|
_________________
Has anyone seen that key I left in the chuck?
*************************************
Check out Ken's Metalshaping Gallery at:
home.cogeco.ca/~kenb2/index.html |
|
| Back to top |
|
 |
Retiredgentleman
650Rider Supporter


Joined: Mar 03, 2007
Posts: 2258
Location: Calgary, Alberta 1978 XS650 SE
|
| Posted: May 29, 2008, 9:55 pm Post subject: Re: Fuel bowl question |
|
Ken; First thing I'll say is I'm not a carb guy, but I did overhaul my carbs over a year ago. As I remember those two holes are the source of fuel for the choke circuit. One hole angling down and meeting the other hole at about 45 degrees. I guarantee that there is a passage way there. You may just have to keep soaking the 2 channels with carb cleaner and eventually they will clear out.................know anyone with an altrasonic cleaner tank?
_________________
Accel Coil, Pamco Ignition, Heiden Oil Filter/Cooler, VR-115 Regulator, Double Bridge Rectifier, 17/33 gearing, 55 mpg |
|
| Back to top |
|
|
kenb
Full Member
Joined: May 11, 2008
Posts: 119
Location: Flamborough, ON, Canada
|
| Posted: May 29, 2008, 10:42 pm Post subject: Re: Fuel bowl question |
|
| Retiredgentleman wrote: |
| I guarantee that there is a passage way there. You may just have to keep soaking the 2 channels with carb cleaner and eventually they will clear out.......... |
Thanks for the reply. After I read your follow-up I went back out to the garage for another look, and after soaking in carb cleaner since this afternoon one of the two passageways has indeed opened up. Hopefully soaking overnight will get the one on the other side cleared out as well.
That's an excellent development, all I need to find now is a couple of new o-rings before I put the carbs back together. I managed to wreck one of the o-rings for the needle valve sleeves (for the floats) during assembly, so I'm hoping that Yamaha will still have some of those around.
Thanks again, I appreciate the help.
Ken
_________________
Has anyone seen that key I left in the chuck?
*************************************
Check out Ken's Metalshaping Gallery at:
home.cogeco.ca/~kenb2/index.html |
|
| Back to top |
|
|
5twins
Full Member
Joined: Aug 05, 2006
Posts: 1616
|
| Posted: May 30, 2008, 12:32 am Post subject: Re: Fuel bowl question |
|
From your photos and description of an o-ring on the float needle seat, it appears you have '80 BS34s. Only the 34s used o-rings on the needle seats and the brass floats were only used in the '80 BS34. All later 34s had plastic floats. Are your carb tops chrome plated tin as opposed to alloy? How about the float needle itself, is it rubber tipped? If the answer is yes to both then you definitely have BS34s.
Yes, the passageway you're trying to clean out is for the choke. There is also a tiny hole in the bottom of the small brass tube that sticks down into that bored hole. It must also be clear for fuel to be drawn up by the choke.
|
|
| Back to top |
|
|
kenb
Full Member
Joined: May 11, 2008
Posts: 119
Location: Flamborough, ON, Canada
|
| Posted: May 30, 2008, 8:17 am Post subject: Re: Fuel bowl question |
|
| 5twins wrote: |
| From your photos and description of an o-ring on the float needle seat, it appears you have '80 BS34s. Only the 34s used o-rings on the needle seats and the brass floats were only used in the '80 BS34. All later 34s had plastic floats. |
Thank you very much for that information, I think you have just saved me from experiencing some massive headaches at the parts counter.
So, the plot thickens. The seller, VIN, and ownership say the bike is a 78, the parts counter folks say it's a 79 because I have a disc brake on the rear wheel as well as the front, and it appears that it has 1980 carbs mounted on it! I suppose it's always possible that previous owners have done a bit of swapping out parts over the years, so I guess I shouldn't be too surprised or worried about it.
| 5twins wrote: |
| Are your carb tops chrome plated tin as opposed to alloy? How about the float needle itself, is it rubber tipped? If the answer is yes to both then you definitely have BS34s. |
Chrome plated tin carb tops - yes
Rubber tipped float needles - yes
That settles it then, I have 1980 BS34's. I'll go check out the availability of those o-rings this afternoon.
Thank you very kindly, I really appreciate you taking the time to help me out.
Ken
_________________
Has anyone seen that key I left in the chuck?
*************************************
Check out Ken's Metalshaping Gallery at:
home.cogeco.ca/~kenb2/index.html |
|
| Back to top |
|
|
xsjohn
Full Member

Joined: Jul 30, 2006
Posts: 5857
Location: North Carolina USSA
|
| Posted: May 30, 2008, 8:37 am Post subject: Re: Fuel bowl question |
|
| Ken....when you get the new o-rings champhor the beginning of the hole in the carb body a bit to help it start.......and use some oil....clean the pilot circuit well......and there is brass caps over the mixture screws if the PO hasn't removed them and there is o-rings under the mixture screws that sometimes give out.....replace the pilot jet (42.5) with a 45 and replace the (132.5) Main Jet with a 135......float setting about 28mm seems to work the best with these jets.....I have other improvements for these carbs if you are interested later.........xsjohn
|
|
| Back to top |
|
|
jimmythetrucker
Full Member
Joined: Mar 12, 2008
Posts: 1283
|
| Posted: May 30, 2008, 8:44 am Post subject: Re: Fuel bowl question |
|
kenb -- In your first post I notice you "went through two cans of carb cleaner," which I understood to mean aerosol spray cans. I also noticed that you didn't say you soaked those carbs. Then I see you wondering, asking questions about those two plugged holes in that float bowl.
Take a hint from what you yourself have said: Using two cans of spray carb cleaner didn't clear blockages in those two holes in the float bowl. Carbs as badly fouled as yours were should be immersed in a can of carb cleaner and soaked for at least 24 hours, after which time they can be rinsed off with clean fuel and then blown out with clean, dry, compressed air. A couple times over with an aerosol carb spray isn't going to penetrate the deepest places in those carb bodies. Unless you soak and blow clean, you're probably going to have trouble after reassembly.
|
|
| Back to top |
|
|
xsjohn
Full Member
Joined: Jul 30, 2006
Posts: 5857
Location: North Carolina USSA
|
| Posted: May 30, 2008, 9:28 am Post subject: Re: Fuel bowl question |
|
| And then you may not have any seals on the throttle shafts if you soak them.............xsjohn
|
|
| Back to top |
|
|
5twins
Full Member
Joined: Aug 05, 2006
Posts: 1616
|
| Posted: May 30, 2008, 10:05 am Post subject: Re: Fuel bowl question |
|
| The '78 Special also had a rear disc brake. And yes, don't soak the entire carb body unless you remove the throttle butterfly, shaft, and the seals or you'll probably destroy the seals. Some carb cleaner is supposed to be rubber friendly but most isn't.
|
|
| Back to top |
|
|
jimmythetrucker
Full Member
Joined: Mar 12, 2008
Posts: 1283
|
| Posted: May 30, 2008, 10:27 am Post subject: Re: Fuel bowl question |
|
| So, John: Are those seals available? If not, is there a workaround? I understand the short answer is "Don't soak the carbs," but, you must admit, sometimes soaking is the only option. What then?
|
|
| Back to top |
|
|
5twins
Full Member
Joined: Aug 05, 2006
Posts: 1616
|
| Posted: May 30, 2008, 10:29 am Post subject: Re: Fuel bowl question |
|
| Remove the seals and all other rubber parts first. The seals are readily available from both the Yamaha shop and aftermarket suppliers. This is one of those rare cases where the shop price is often less. I've seen them from on-line Yamaha shops for as little as $2. Aftermarket places usually want $5 each. This seal is still used on the 250 Virago and some of the 600 four carbs.
|
|
| Back to top |
|
|
xsjohn
Full Member
Joined: Jul 30, 2006
Posts: 5857
Location: North Carolina USSA
|
| Posted: May 30, 2008, 10:40 am Post subject: Re: Fuel bowl question |
|
Ok.....here is what I would do first.....go ahead and soak that bowl.....don't think there is any thing in there that would get hurt.....then remove the mixture screw washer and rubber o-ring.....and the choke plunger rod (dont loose tiny spring and ball) and remove the chokes....and remove the needle jet and the pilot jet.......
Then get some Dragons Fire (by Castle) form autozone and some brake cleaner.....work the bodies over good flushing with brake cleaner as you go....paying special attention to the pilot jet area....and the small holes behind the butterfly that feed the low speed mix...carb cleaner coming out of there when you spray into the area where the mix screws were..and using compressed air....if not use a small guitar string to prod the 4 small holes carefully....then try them before you go to a complete dismantle........... 45 pilot jet and 135 Main jet when assembled..
and if you try to take the carbs off the main bar the screws are loctited in and need to be heated or they can break......and if the fuel line T that connects to each carbs moves easily back and forth the o-rings in there may need replacing or it can leak from there......real bummer that one is...
A do be careful if you use the Dragon Fire.......it is very potent and flush with brake cleaner......should use fan at your back as to not breath it....or it can spank you good.....then we can talk needles if you are interested and got them back and running.......
xsjohn
|
|
| Back to top |
|
|
kenb
Full Member
Joined: May 11, 2008
Posts: 119
Location: Flamborough, ON, Canada
|
| Posted: May 30, 2008, 11:57 am Post subject: Re: Fuel bowl question |
|
| xsjohn wrote: |
| Ken....when you get the new o-rings champhor the beginning of the hole in the carb body a bit to help it start.......and use some oil....clean the pilot circuit well...... |
You must have read my mind, that was going to be one of my next questions! I'm pretty sure that's how I wrecked to old one, that and the fact that the rubber was quite dried out. The new o-rings will be coming in a rebuild kit that includes the complete needle valve seat, so I'll follow your advice to the letter when I put them in.
| xsjohn wrote: |
| and there is brass caps over the mixture screws if the PO hasn't removed them and there is o-rings under the mixture screws that sometimes give out.....replace the pilot jet (42.5) with a 45 and replace the (132.5) Main Jet with a 135......float setting about 28mm seems to work the best with these jets.....I have other improvements for these carbs if you are interested later.........xsjohn |
The mixture screws & choke mechanisms are the only things I have left to clean out besides the remaining plugged fuel bowl I think, so I'll see how things look in there when I take the screws out today. I'll check with the dealer to make sure I'll be getting new o-rings for those with the rebuild kit.
With regards to the pilot & main jets, would those sizes still apply if I change out the air filters to K&N's that attach directly to the back of the carbs? I'm thinking of going that route since the stock air box on the bike is pretty badly beaten up and I don't feel like spending any money there. This is just the beginning of a major customization job on the frame in that area, and the stock layout will probably be eliminated completely once I start cutting. I'm aware that I'll also have to deal with the crankcase ventilation hoses as well.
************
| jimmythetrucker wrote: |
| Carbs as badly fouled as yours were should be immersed in a can of carb cleaner and soaked for at least 24 hours, after which time they can be rinsed off with clean fuel and then blown out with clean, dry, compressed air. A couple times over with an aerosol carb spray isn't going to penetrate the deepest places in those carb bodies. Unless you soak and blow clean, you're probably going to have trouble after reassembly. |
Soaking the parts seemed like the plan to me as well, but after reading up on some other threads I was concerned about damaging the rest of the rubber parts, so I thought I'd give it a go with the spray cans first. Aside from the mixture screws and that one fuel bowl I think I've got things cleared out pretty good so far, but as you suggest, I might just have to resort to the full soaking treatment if things don't go well one those two areas. I'm not too worried either way, it's just that for now I'd like to keep the costs down wherever possible until I get it running well enough to take it for a ride around the block to see what I've got.
************
| 5twins wrote: |
| Remove the seals and all other rubber parts first. The seals are readily available from both the Yamaha shop and aftermarket suppliers. This is one of those rare cases where the shop price is often less. I've seen them from on-line Yamaha shops for as little as $2. Aftermarket places usually want $5 each. This seal is still used on the 250 Virago and some of the 600 four carbs. |
It's actually been quite reassuring to see just how much stuff is still available for this bike. They've been able to get just about everything I've asked for so far, so things are easier to get than I expected.
*************
| xsjohn wrote: |
| Ok.....here is what I would do first.....go ahead and soak that bowl.....don't think there is any thing in there that would get hurt.....then remove the mixture screw washer and rubber o-ring.....and the choke plunger rod (dont loose tiny spring and ball) and remove the chokes....and remove the needle jet and the pilot jet....... |
Got it, the bowl is soaking as we speak. I was going to overlook the choke mechanisms for now, but that's beginning to sound like a really stupid notion so I'll go after those this afternoon as well.
| xsjohn wrote: |
| Then get some Dragons Fire (by Castle) form autozone and some brake cleaner.....work the bodies over good flushing with brake cleaner as you go....paying special attention to the pilot jet area....and the small holes behind the butterfly that feed the low speed mix...carb cleaner coming out of there when you spray into the area where the mix screws were..and using compressed air....if not use a small guitar string to prod the 4 small holes carefully....then try them before you go to a complete dismantle........... 45 pilot jet and 135 Main jet when assembled.. |
Those holes around the butterfly are all clear from yesterday, I was actually surprised at how easy that part of the job was, because that was where I anticipated having the most trouble.
| xsjohn wrote: |
| and if the fuel line T that connects to each carbs moves easily back and forth the o-rings in there may need replacing or it can leak from there......real bummer that one is... |
I'm expecting that one to come back and bite me in the ass sooner than later, because somebody has already been in there with the silicone to deal with a previous leak. I figured I verify that situation when I put the gas to it when I set the float levels on the workbench with the tubing out of the bottom of the float bowls. I've been trying to avoid splitting the carbs at this point, so I'll see what happens there when I set the floats.
| xsjohn wrote: |
| then we can talk needles if you are interested and got them back and running....... |
Cool, I'd like that. Please let me know if those jets sizes will work OK with the K&N air filters.
Thanks for the replies everybody, you guys are terrific.
Ken
_________________
Has anyone seen that key I left in the chuck?
*************************************
Check out Ken's Metalshaping Gallery at:
home.cogeco.ca/~kenb2/index.html |
|
| Back to top |
|
|
kenb
Full Member
Joined: May 11, 2008
Posts: 119
Location: Flamborough, ON, Canada
|
| Posted: May 30, 2008, 2:16 pm Post subject: Re: Fuel bowl question |
|
More progress, a minor setback, and perhaps a major screw-up....
First the progress.
I've cleaned out the mixture adjuster screw holes and the choke bores, and most of the passages seem to be free and clear with a couple of exceptions.
1) The mixture screw holes are clear through into the throttle bores, but I haven't quite figured out where the fuel source to the needles is coming from. Would I be correct in assuming that the fuel feeds in from the bores that the choke plungers ride in? If so I'll need to open them up, because I can't seem to get carb cleaner to pass through in either direction.
2) In the picture below I have traced the route in red dots that I believe the fuel travels from the pilot jet up to the three holes on the roof of the throttle bore just above the butterfly, which is totally clear and free flowing. The passageway seems to be plugged where I have indicated with the red arrow, and it seems to me that it should be, because I can't see any reason to be providing fuel into the diaphram chamber. I suspect that these holes leading into the diaphram chamber were the only way to drill out the passage below, and then they were intentionally plugged afterwards. Does that sound right?
Now the minor setback:
The adjuster screw on the right side carb was slightly more difficult to remove than the other one, and I knew why when I saw the threads on it after I got it out. There's no way I'm going to put that screw back in there again, so I'll order a new one when I'm back at the dealer. It's a case of minor cross threading which I think will clean up OK by running a tap through it, would anybody know what (extremely fine) tap size that would be?
Now for the screw-up:
I got that other fuel bowl opened up, by hand turning a drill bit through it until it made it to the bottom of the bore. Then I spotted some brass shavings on the bit, and I knew I had just screwed up big time. The bit was only oversized enough to cause almost an undetectable resistance on the way through, but nonetheless I have opened up the hole size to some degree. Obviously that brass bushing had an intended bore diameter, so I suspect that I'm going to be looking around for another fuel bowl.
The other option is pulling it out somehow and replacing it. For what it's worth, I do have a Myford ML7 lathe and lots of brass round stock over here, so if I can find a way of fishing it out of there, making a new one would be the easy part of the job.
Is this a serious enough issue to get worried about? I'll see what you guys think before I wander in any deeper.
Ken
| Description: |
|
| Filesize: |
66.49 KB |
| Viewed: |
2164 Time(s) |

|
_________________
Has anyone seen that key I left in the chuck?
*************************************
Check out Ken's Metalshaping Gallery at:
home.cogeco.ca/~kenb2/index.html
Last edited by kenb on May 30, 2008, 2:30 pm; edited 2 times in total |
|
| Back to top |
|
|
xsjohn
Full Member
Joined: Jul 30, 2006
Posts: 5857
Location: North Carolina USSA
|
| Posted: May 30, 2008, 2:26 pm Post subject: Re: Fuel bowl question |
|
You may be in uncharted territory now........but looked in my spare bowl and the pinhole looks to be about .022 or so and is recessed an 1/8 of an inch or so below the brass fixture it is in.....you probably just touched the brass and not the tiny hole diameter below it...........with some luck....soak and blow with air in both dirrections until that hole is cleared...
If you did open that pinhole you would have a choke from hell for sure......would take a picture of it for you but it would be like taking a picture of a Chinaman after diging a posthole......
..xsjohn
|
|
| Back to top |
|
|
xsjohn
Full Member
Joined: Jul 30, 2006
Posts: 5857
Location: North Carolina USSA
|
| Posted: May 30, 2008, 3:16 pm Post subject: Re: Fuel bowl question |
|
Now I know if any Chinamen try to sneak up through a posthole I was digging I can get a picture of them if they would hold still........after 15 trys some success..........xsjohn
could prod that hole with a guitar string if it is obstinate........
| Description: |
|
| Filesize: |
179.12 KB |
| Viewed: |
287 Time(s) |

|
|
|
| Back to top |
|
|
kenb
Full Member
Joined: May 11, 2008
Posts: 119
Location: Flamborough, ON, Canada
|
| Posted: May 30, 2008, 3:47 pm Post subject: Re: Fuel bowl question |
|
| xsjohn wrote: |
If you did open that pinhole you would have a choke from hell for sure...
.xsjohn |
Yep, I know for sure that I did open it up, that was a really stupid thing to do. That goes to show what a bit of impatience and momentary over-enthusiasm will do for you.
Not to worry, I'll see if I can dig it out of there over the weekend after I get some other chores on the bike out of the way. I'll be waiting until Tuesday for the rest of the carb parts anyhow, so that'll give me some time to try to redeem myself! I'm waiting for the parts department to call me back about the mixture needles & o-rings right now anyhow, so I'll get a price on a new fuel bowl while I'm at it.
Thanks for taking that picture, how did you manage to pull that off anyhow!? 
Ken
_________________
Has anyone seen that key I left in the chuck?
*************************************
Check out Ken's Metalshaping Gallery at:
home.cogeco.ca/~kenb2/index.html |
|
| Back to top |
|
|
xsjohn
Full Member
Joined: Jul 30, 2006
Posts: 5857
Location: North Carolina USSA
|
| Posted: May 30, 2008, 3:56 pm Post subject: Re: Fuel bowl question |
|
Just dumb luck getting it with the sun just in the right place....and my appaplexy under control....and that isn't even the trigger finger that I use on the camera......may have to switch to a shotgun to keep the holes on the target soon......
don't really have appaplexy.....think that is just my hands clentching together as if they were around some throats.....thinking about too much politics lately......I spose........
ight could if all else fails plug that one off without hurting the brass rod (like from the other side) and start it on the other carbs choke....especially with the summer and all ....till you can find another bowl....with allens in the float bowl changing that out on the bike would be minutes....xsjohn
.....................................................................
By the way with my latest needle kit running way stronger and smoother than ever could have been imagined stock..............and balanced cylinder temperatures.......................224 degrees at 85 degrees ambient......which is 20 degrees below stock...................
Just filled up again.....BS34's 1980.....54.1 MPG mixed with no expressway......I ain't dicking with mine for sure.......
46 pilot @ 1 or so turns
custom Right/Left needles the thin shim supplied......
custom 134 main jets
ufflers and modded air box and 18/29 gearing.......and 140 sized rear tire
3000 @ 55MPH
3500 @ 65MPH
3900 @ 70MPH
xsjohn 5/30/08
|
|
| Back to top |
|
|
jopower
Full Member

Joined: Aug 30, 2006
Posts: 20
Location: Colorado North 40
|
| Posted: June 3, 2008, 5:32 am Post subject: Re: Fuel bowl question |
|
Since Kenb is a machinist (to some extent), why not check the other side (good) choke bore for correct wire size in the drilled metering plug I can see in Xsjohn's pic. Then size the choke bore. Make another plug on your lathe the size of the bore and drill it to the wire size you found. Now drill the damaged plug out to the correct bore size and knock in the new plug. You should be back to OEM alround. 
|
|
| Back to top |
|
|
kenb
Full Member
Joined: May 11, 2008
Posts: 119
Location: Flamborough, ON, Canada
|
| Posted: June 4, 2008, 6:45 pm Post subject: Re: Fuel bowl question |
|
| jopower wrote: |
| Since Kenb is a machinist (to some extent), why not check the other side (good) choke bore for correct wire size in the drilled metering plug I can see in Xsjohn's pic. Then size the choke bore. Make another plug on your lathe the size of the bore and drill it to the wire size you found. Now drill the damaged plug out to the correct bore size and knock in the new plug. You should be back to OEM alround. |
You read my mind! I actually picked up the .021" drill bit from SB Simpson yesterday, it was the one size I could get 1 of without ordering them in quantity, and is the smallest drill bit I've ever seen! Based on the wire sizes I was able (& not able) to fit through the orifice on the good side, I figured that .021" had to be within a couple of thou of the proper size. I was actually looking forward to making the attempt to fix that.
Then I found a pair of parts carburators today. They've been previously raided for a few parts, but everything I'm going to need to fix mine is there by the looks of it.
This takes care of the damaged fuel bowl and leaves me with a spare, and it also provides me with 2 potential replacement carb bodies to use when I put a usable pair together to bolt on the bike. Since one of my original carbs may have a cross threaded mixture screw hole (the screw was a mess when it came out, see below), I'm hoping I can swap it out with one of the units I picked up today.
So here's the lowdown: My original carbs are 1980 BS34's, as 5twins pointed out when he spotted the brass floats in my pictures. The carbs I found today look identical, but the floats are made of plastic, so I'm guessing that they are from a later model year (the guy didn't know what year they are from).
I'm thinking about trying the rebuild using my original carbs, as long as the mixture screw threads cleanly into the bore in the right side carb, using one of the mixture screws from the carbs I picked up. Unless, somebody knows for sure that I can swap it out for one of the carb bodies I got today, which would be an even safer route to take.
Anybody know if there might be differences between the 1980 & later carb bodies that might bite me in the ass here?
Ken
| Description: |
|
| Filesize: |
56.39 KB |
| Viewed: |
196 Time(s) |

|
_________________
Has anyone seen that key I left in the chuck?
*************************************
Check out Ken's Metalshaping Gallery at:
home.cogeco.ca/~kenb2/index.html |
|
| Back to top |
|
|
5twins
Full Member
Joined: Aug 05, 2006
Posts: 1616
|
| Posted: June 4, 2008, 7:12 pm Post subject: Re: Fuel bowl question |
|
| I think the bodies are the same but the float bowls may differ. The plastic floats have a different shape and the bowl may have been changed to accommodate that. You'll just have to see if your brass floats will fit in those newer bowls. They may also throw the float level off so you might have to experiment with different level settings.
|
|
| Back to top |
|
|
|
|
You cannot post new topics in this forum
You cannot reply to topics in this forum
You cannot edit your posts in this forum
You cannot delete your posts in this forum
You cannot vote in polls in this forum
You cannot attach files in this forum
You can download files in this forum
|
|
|
|
| |
Check out the new Honda CB750 Forum at CB750.com! A site dedicated to the great Honda SOHC and DOHC CB750.
Check out the new Yamaha XS400 Forum at XS400.com!
Yamaha xs650
xs650, xs, 650, forum, links, chopper, custom, yamaha, parts, forum, info,
information, bb, bulletin board, XS650 650Rider, Free Unrestricted xs650
forum, Personal photo albums, Post images in Forum, News columns, Daily blog,
Links, Event calendar, Information for Yamaha XS650
Interactive software released under GNU GPL,
Code Credits,
Privacy Policy
|
|