|
Search 650Rider.com and XS650.com using Google!
|
 | |
|
|
|
| xs650 > > Custom Work: Chop, Bob, Cafe and Flattracker - Streettracker > > Cafe Racer > > Cafe Racer project in Australia |
|---|
Cafe Racer project in Australia
Go to page 1, 2, 3, 4 Next |
| Author |
Message |
Razar
Full Member


Joined: Jul 03, 2008
Posts: 103
Location: North Coast New South Wales Australia
|
 Posted: July 4, 2008, 4:42 am Post subject: Cafe Racer project in Australia Posted: July 4, 2008, 4:42 am Post subject: Cafe Racer project in Australia |
|
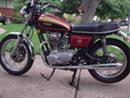
Hi, I've been playing with this for a while. Finally something to show.
This is being builtr from a couple of incomplete basket cases, a 77 and an 81. I,ve used the 77 frame because I like the rear footpeg loops. Ive modified them to mount my rearsets and an exhaust support tab.
I've done the steering head bearings and bronze swing arm bushes. Cut off the centerstand mount and the battery box etc, the footpeg mounting bolts and anything else I didn't want.Progressive springs, new seals and stripped and polished the forlk sliders.
On the 81 35mm triple clamps there is no lip for fork boots so i made up a couple of alloy rings that clamp to the legs just under the lower clamp. I'm using billet alloy clipons fro a Yam YZ250?Look great,cheap from wreckers. S/S old style bar end mirror. Bates 5inch deep dish headlight and mini guages from Mikes. Electronic tacho.(goodbye messy tacho cable) Making my own LED blinkers from some 1/2 inch Aluminium tube.
I've stripped down the motor (dropped a big end bearing and been sitting in a shed for years) Had it bored, so new pistons etc. timing chain and guides got a 2nd hand crank and rods in good nick. Way cheaper than pulling down the crank and doing the bearings etc. I've bead blasted the barrels and cases etc and painted the barrels black. Polished the covers.
I' ve got a couple of vw34 mikunis and pods and willbe making my own electronic ignition from a celica set up. The engine is still in boxes as I'm concentrating on the rest of the bike for the moment.
I'v stripped down the spoked alloy wheels and bought a set of Buchannans butted S/S spokes polished the hub and rim flanges and painted the centers a metal flake black. I haven't laced them up yet, hence the filthy old things and the dummy engine in the photo's.
I;m going to have a go at making my own alloy tank and seat. See the tank pattern on the bike.The seat will have a squarish duck tail that will house the battery etc and be upholstered in ostrich leather. Tail lights Leds I've been working on the front guard today. I've only just started to try aluminium welding, so I'm finding it an interesting callenge. Will post photo soon, Its finished but it's too dark to photograph it. It's a minimalist guard.
Rearsets are made from bits and pieces with all the brake and gear rods made from stainless. I'll post pics when the brake lever comes back from the chromers
Oh and the thing that I finally have together to show is the exhaust. These pipes are 316 Stainless 38 mm x 1.6mm with home made megaphones with baffle and stuffed with S/S wool. Whew. I'll try and keep it short as I update as things start going together.
| Description: |
|
| Filesize: |
143.5 KB |
| Viewed: |
432 Time(s) |

|
| Description: |
|
| Filesize: |
190.61 KB |
| Viewed: |
432 Time(s) |

|
|
|
| Back to top |
|
 |
striker
New Member


Joined: Jul 04, 2008
Posts: 7
|
| Posted: July 4, 2008, 5:03 am Post subject: Re: Cafe Racer project in Australia |
|
Razar -
Sounds like you're in for some fun with your new project - I hope it goes well for you!
A quick question for you - what tacho will you be using? I have tried a few variations on the theme with rejigging a car tacho and fitting into an original tacho housing. Though it worked, the vibration caused a few issues . . .
Striker
|
|
| Back to top |
|
|
Razar
Full Member
Joined: Jul 03, 2008
Posts: 103
Location: North Coast New South Wales Australia
|
| Posted: July 4, 2008, 5:28 am Post subject: Re: Cafe Racer project in Australia |
|
Hi Striker,
The tacho came from Mikes XS. He has a mini size electronic. If I remember correctly you have to have a twin fire ignition
Razar
|
|
| Back to top |
|
|
striker
New Member
Joined: Jul 04, 2008
Posts: 7
|
| Posted: July 4, 2008, 5:35 am Post subject: Re: Cafe Racer project in Australia |
|
Thanks for that Razar.
Striker.
|
|
| Back to top |
|
|
pumps
650Rider Supporter

Joined: May 29, 2007
Posts: 1993
Location: Kansas City, Missouri, U.S.A.- 1977 XS650 "D" Standard
|
|
| Back to top |
|
|
Razar
Full Member
Joined: Jul 03, 2008
Posts: 103
Location: North Coast New South Wales Australia
|
| Posted: July 4, 2008, 8:54 pm Post subject: Re: Cafe Racer project in Australia |
|
Hi Pumps,
That set up looks good, but I'm going for the retro Triton look, so I'm sticking to analog.
Here's a pic of the front guard. I'm not sure if I'm going to keep it yet, It may be a bit too small. Still it can sit there whilst I get on with other stuff.
Ed
| Description: |
|
| Filesize: |
201.44 KB |
| Viewed: |
365 Time(s) |

|
|
|
| Back to top |
|
|
Cooltouch
Full Member

Joined: Jan 07, 2007
Posts: 568
Location: Houston, Texas
|
| Posted: July 4, 2008, 10:53 pm Post subject: Re: Cafe Racer project in Australia |
|
Hey Razar,
Nice to see another guy working on a cafe bike. Yours looks nice so far!
ine's a '78E, and I'm using an XS750 tank, which looks decent, but nothing like what you got. Now, that's a tank! So, you're gonna make one like that?
I take it you'll be fabbing the seat, too, eh?
Best,
ichael
_________________
Triple Tuning Forks Rule!
'81SH, '80SG, '78E, '77D |
|
| Back to top |
|
|
Razar
Full Member
Joined: Jul 03, 2008
Posts: 103
Location: North Coast New South Wales Australia
|
| Posted: July 6, 2008, 12:22 am Post subject: Re: Cafe Racer project in Australia |
|
Hi Michael,
Yeah, It's going to be fun. I've never done any aluminium work like it before, so I'm sort of teaching myself as I go along. I plan to make a fiberglass mold off the plug in the photo, then cast a cement block to use as a former/dolly, maybe even use the fiberglass molds as well as a press? I'll probably paint the cement with some polyester resin to stabilise the surface so it will stand up to some hamering. At the moment I'm working on bringing the plug up to scratch so I can do the molds. There'll be 2 half top panels and 1 for the frame tunnel. The top has a well in the centre about 50mm across for a strap to clamp the tank down.
The beauty of this approach is that I can make fiberglass tanks from the molds as well. I've had a bit of coment about the tank, and I fell for it when I first saw it. In fact It was the 1st part of the project.I bought it even before I'd decided to use an XS 650. Ive got a 50 mm alloy Monza cap that will mount on the right sid of the strap well.
I'll be doing the seat too. A little like the old 900 kawasaki tail. With someThin LED light bars for tail and stop lights and the battery etc behind the seat. I'm going to upholster the seat in distressed brown ostrich leather. It's great looking stuff.
I'm making up the LED light bars so that I can get the right look. I'm casting the rows into red tinted casting resin about 12mm wide and 100mm long. I am also planning to do the blikers in LEDs too by casting them onto a half 12mm aluminium tubing in Amber resin.
Lot's of plans , so little time.
I had a look at your blog and see that you've started at about the sameplace, total wreck!! I couldn't bring myself to hack up a good bike either.
It says you were thinking of bars. Clubmans are probably traditional, but take a look at a set of clipons from a yam. yz(r) 250 Real nice billet alloy that fit the 35mm fork legs and polish up a treat. Sorry can't remember what year, but should be cheap from wrecker or ebay. Ed
|
|
| Back to top |
|
|
Cooltouch
Full Member
Joined: Jan 07, 2007
Posts: 568
Location: Houston, Texas
|
| Posted: July 6, 2008, 1:33 pm Post subject: Re: Cafe Racer project in Australia |
|
Hey Razar,
With all that setup work you're gonna be doing for your tank, it looks like it won't be that difficult for you to make more. Have you given any though yet to offering them for sale? If so, I might be interested at some point down the road.
Radiantz makes LEDs for bikes in bars that are flexible. I'm thinking very seriously about buying some of these to mount on the rear of my bumstop seat. Check out this link:
www.radiantz.com/cart/...?c6.html&1
I've decided against clip-ons or clubmans -- rearsets too as far as that goes -- because I want/need more of an upright riding style. My back and neck won't tolerate the assume-the-position stance for very long. I have a set of superbike style bars that provide enough lift and pullback for a reasonably comfortable, slight forward-leaning position, which I prefer. Shouldn't look too out-of-place on a cafe bike.
Best,
ichael
_________________
Triple Tuning Forks Rule!
'81SH, '80SG, '78E, '77D |
|
| Back to top |
|
|
pumps
650Rider Supporter
Joined: May 29, 2007
Posts: 1993
Location: Kansas City, Missouri, U.S.A.- 1977 XS650 "D" Standard
|
| Posted: July 6, 2008, 2:44 pm Post subject: Re: Cafe Racer project in Australia |
|
That Radiantz stuff is very interesting.
_________________
You don't HAVE to be crazy to run into burning buildings, but it HELPS!
On an XS you won't pass yourself on the road everyday. 
My Bikes |
|
| Back to top |
|
|
Razar
Full Member
Joined: Jul 03, 2008
Posts: 103
Location: North Coast New South Wales Australia
|
| Posted: July 6, 2008, 8:07 pm Post subject: Re: Cafe Racer project in Australia |
|
Hi Micheal,
Thanks for that Radiantz link. They look just the thing. Unfortunately I've already bought all the LEDs. I'll have to think some more on this.
As to the tank. I was thinking of making some for sale if they turn out OK. That was part of the reasoning behind all the prep work. I've been making molds for a few years. I have a part time garden statue business making copies of statues I've bought back from Bali. So it's pretty easy for me to do all the fiberglass stuff. We'll have to wait and see how the aluminium work turns out.
I've got a less than perfect back too, but I find the crouch is actually better for me. I'm going fairly extreme with the rear sets and clip ons, but it feels comfy to me just sitting on it. I ride a Suzuki SV 650 and find the standard pegs give me sciatica. I improved it somewhat by fitting flat drag bars that get me leaning a bit more forward.
Ed
|
|
| Back to top |
|
|
Cooltouch
Full Member
Joined: Jan 07, 2007
Posts: 568
Location: Houston, Texas
|
| Posted: July 6, 2008, 10:37 pm Post subject: Re: Cafe Racer project in Australia |
|
Oh, I prefer the slight forward lean too. It's better for my back. But clip-ons take it to an extreme. I have a BMW R100RS that has clip-on style bars, and I find its riding position less than comfortable.
Keep us posted on your tank work. Big tanks like that made for the XS650 are just about impossible to find.
Best,
ichael
_________________
Triple Tuning Forks Rule!
'81SH, '80SG, '78E, '77D |
|
| Back to top |
|
|
Razar
Full Member
Joined: Jul 03, 2008
Posts: 103
Location: North Coast New South Wales Australia
|
| Posted: July 7, 2008, 5:48 am Post subject: Re: Cafe Racer project in Australia |
|
Upate!!
Still working on the tank plug, I have to resculpt the frame tunnel. It's nearly done. It's winter here and cool and wet, so working with resin is a slow business. So while the filler was going off I thought I would have a go at lacing up the front wheel. It took me a couple of tries to get it right. I was sure that I'd read somewhere to start with the outside spokes. WRONG So first I got the pattern wrong and then I got the pattern right but couldn't get the last row in. So I had to pull it down again and start with the inside spokes. FINISHED. Well sort of. I have to throw together a truing stand and sort out the wobbles. Ed
Some pics for your viewing pleasure!!
| Description: |
|
| Filesize: |
219.72 KB |
| Viewed: |
388 Time(s) |

|
| Description: |
|
| Filesize: |
185.5 KB |
| Viewed: |
340 Time(s) |

|
|
|
| Back to top |
|
|
Razar
Full Member
Joined: Jul 03, 2008
Posts: 103
Location: North Coast New South Wales Australia
|
| Posted: July 10, 2008, 9:11 pm Post subject: Re: Cafe Racer project in Australia |
|
Figured out a good and easy way to throw together a truing jig. A paddock stand and some steel and a steel ruler . Works great. I have the front wheel in getting a tire fitted and am in the process of truing the rear wheel.It's all turned out to be really easy.
| Description: |
|
| Filesize: |
232.67 KB |
| Viewed: |
363 Time(s) |

|
|
|
| Back to top |
|
|
pumps
650Rider Supporter
Joined: May 29, 2007
Posts: 1993
Location: Kansas City, Missouri, U.S.A.- 1977 XS650 "D" Standard
|
| Posted: July 10, 2008, 10:34 pm Post subject: Re: Cafe Racer project in Australia |
|
I saw someone here just using an extra swingarm clamped to a bench.
_________________
You don't HAVE to be crazy to run into burning buildings, but it HELPS!
On an XS you won't pass yourself on the road everyday.
My Bikes |
|
| Back to top |
|
|
Razar
Full Member
Joined: Jul 03, 2008
Posts: 103
Location: North Coast New South Wales Australia
|
| Posted: August 6, 2008, 3:54 am Post subject: Re: Cafe Racer project in Australia |
|
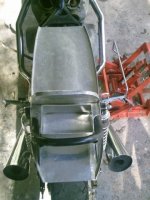
Update! Finished the Rearsets.
Nothing much has been happening for a while. Had the flu. But at last I got the brake lever back from the chromers. Its the straight one that goes on the spline. The brake pedal in the photo I made out of stainless.
Thanks for looking. Ed
| Description: |
|
| Filesize: |
133.78 KB |
| Viewed: |
425 Time(s) |

|
| Description: |
|
| Filesize: |
180.31 KB |
| Viewed: |
500 Time(s) |

|
| Description: |
|
| Filesize: |
168.96 KB |
| Viewed: |
417 Time(s) |

|
|
|
| Back to top |
|
|
Razar
Full Member
Joined: Jul 03, 2008
Posts: 103
Location: North Coast New South Wales Australia
|
| Posted: September 12, 2008, 4:18 am Post subject: Got the right batteries at last |
|
Hi Guys,
I've finally got the camera working again.
I've been working on the front brakes. I had to make up some 10mm spacers to improve clearance with the spokes. This turned out not to be enough for the four pot tokico calipers that I had for the job. I then realised that all the pictures I'd seen of this mod. were of cast wheels????
There is no where near enough room with the spoke wheels.
I thought that I could maybe use the 4 pots to upgrade the brakes on my SV 650. It runs 2pot floating calipers. On measureing, I found that that the SV's were thinner at the back and most of that was reinforcing for the floating pad, so it can be machined back a little if necessary. I ended up buying a complete system off an 01 on American Ebay for about $30+ $55 for post. You Americans have got it good with the cheap bits. Even with the freight it's less than I would have to pay here, if I could find one.Any way, I digress.
So far I haven't fitted them. Ed
| Description: |
|
| Filesize: |
90.54 KB |
| Viewed: |
349 Time(s) |

|
|
|
| Back to top |
|
|
Razar
Full Member
Joined: Jul 03, 2008
Posts: 103
Location: North Coast New South Wales Australia
|
| Posted: September 15, 2008, 4:24 am Post subject: Re: Cafe Racer project in Australia |
|
Hi,
I was at Gold Coast Bikeweek a couple of weeks ago. A friend of mine does the video every year and I go up and give him a hand. It's a Harley chopper fest that has some great custom bikes. The standard of the work on most of these is mindblowing. It's been a great inspiration to try and get a good finish on my project.
While I was waiting for the brake calipers to arrive I started on making the seat. The idea was to put the battery and other electrical components up in the duck tail.
I started by hamer foming the seat pan and seat back, then pop riveted them together. I've used a full length pan and shaped it to fit around the rear seat loop which I have retained. Behind the seat back panel I've fixed a battery tray to take an agm battery. At the front of the seat I've welded a mount on the seat rails that the seat bolts to and also the catch for the tank strap.
When it came to forming the cowl, I started hamerforming it till I got almost to the right shape, realised that to get a good finish was going to drive me insane. The English Wheel seemed to be the answer.
www.roddingroundtable....wheel.html
I found plans on the net to make one from some tubing and bearings. See photo. This was great, though I need to brace it as it's a bit springy, It rolled out most of the marks and finised the shaping quickly.
I found when I went to polish it that the springy roller leaves an uneven surface that I've had to spend hours sanding flat.Still I'm pleased with the results and now feel confident to start on doing the tank.
Hear are some photo's that go with the rave. Ed
| Description: |
|
| Filesize: |
103.98 KB |
| Viewed: |
440 Time(s) |

|
| Description: |
|
| Filesize: |
81 KB |
| Viewed: |
387 Time(s) |

|
| Description: |
|
| Filesize: |
51.37 KB |
| Viewed: |
373 Time(s) |
|
|
|
| Back to top |
|
|
Razar
Full Member
Joined: Jul 03, 2008
Posts: 103
Location: North Coast New South Wales Australia
|
| Posted: September 15, 2008, 4:31 am Post subject: Re: Cafe Racer project in Australia |
|
And a couple more.
| Description: |
|
| Filesize: |
112.46 KB |
| Viewed: |
355 Time(s) |

|
| Description: |
|
| Filesize: |
114.68 KB |
| Viewed: |
375 Time(s) |

|
|
|
| Back to top |
|
|
pumps
650Rider Supporter
Joined: May 29, 2007
Posts: 1993
Location: Kansas City, Missouri, U.S.A.- 1977 XS650 "D" Standard
|
| Posted: September 15, 2008, 6:44 am Post subject: Re: Cafe Racer project in Australia |
|
Good work. But you should get your money back on that battery, having two positives it will never start! j/kidding. Th e wheel does is a great tool.
_________________
You don't HAVE to be crazy to run into burning buildings, but it HELPS!
On an XS you won't pass yourself on the road everyday.
My Bikes |
|
| Back to top |
|
|
Razar
Full Member
Joined: Jul 03, 2008
Posts: 103
Location: North Coast New South Wales Australia
|
| Posted: September 18, 2008, 4:49 am Post subject: Re: Cafe Racer project in Australia |
|
Today I was mostly out getting stuff to finish off the seat and tail light. Also picked up a set of good quality Thruxton bar end mirrors from the local Triumph dealer. I was looking at them because there was a set on ebay that I was thinking about. My mirror that I bought for the bike I've put on my SV 650, and basically it's not great quality. The guy in the shop had a set and offered them to me for a little more than the ebay pair as the new model runs 1" bars and these are for 7/8". They look much better made.
I'm working on the tail light. I'm making a D shape lense with the LEDs cast into it. I've made up the bars with some circuit board . I'm now setting these into the mold made from some fluro light diffuser and plasticene. I'll do 3 layers.One clear to hold the leds in place and take on the form from the diffuser, another clear to totally encase the bars and wires and mounting brackets, and a red layer over the diffuser pattern to give a smooth surface. Ill paint the back silver then black. Hope fully this will spread the light around inside the lense a bit. I hope to also use the light from the clear layer to shine through holes in the seat pan onto the number plate. Ed
| Description: |
|
| Filesize: |
40.59 KB |
| Viewed: |
325 Time(s) |

|
| Description: |
|
| Filesize: |
74.06 KB |
| Viewed: |
361 Time(s) |

|
|
|
| Back to top |
|
|
p73ornstar
Full Member
Joined: Jun 17, 2008
Posts: 54
|
| Posted: September 18, 2008, 8:30 am Post subject: Re: Cafe Racer project in Australia |
|
| What materials do you use for the plastic? I know you said you are doing two layers of clear and one in red. What type of plastic or resin stuff do you use? Inquiring minds want to know!
|
|
| Back to top |
|
|
Razar
Full Member
Joined: Jul 03, 2008
Posts: 103
Location: North Coast New South Wales Australia
|
| Posted: September 19, 2008, 3:27 am Post subject: Re: Cafe Racer project in Australia |
|
I'm using fiberglass resin.A fairly clear surfboard resin and transparent colour.
The diffuser mold turned out to be of no benefit.It hasn't spread the light around. The guy at the fiberglass supplies said the stuff would be clear but it's gone off a light milky blue, which is ok. It looks OK when the lights are turned on.
| Description: |
|
| Filesize: |
59.71 KB |
| Viewed: |
362 Time(s) |

|
|
|
| Back to top |
|
|
Razar
Full Member
Joined: Jul 03, 2008
Posts: 103
Location: North Coast New South Wales Australia
|
| Posted: October 15, 2008, 2:59 am Post subject: Re: Cafe Racer project in Australia |
|
Hi Guys,
I finished the seat over a week ago, but couldn't post as my camera was stolen when my house was burgled last week.
y plan was to use ostrich leather, but I haven't been able to get hold of any yet. I did find some upholstery vinyl with ostrich embossing which is OK. I'll be making up a strip to run along the side of the seat to cover the gap between it and the frame rail.
| Description: |
|
| Filesize: |
69.62 KB |
| Viewed: |
352 Time(s) |

|
| Description: |
|
| Filesize: |
64.32 KB |
| Viewed: |
413 Time(s) |

|
|
|
| Back to top |
|
|
|
|
You cannot post new topics in this forum
You cannot reply to topics in this forum
You cannot edit your posts in this forum
You cannot delete your posts in this forum
You cannot vote in polls in this forum
You cannot attach files in this forum
You can download files in this forum
|
|
|
|
| |
Check out the new Honda CB750 Forum at CB750.com! A site dedicated to the great Honda SOHC and DOHC CB750.
Check out the new Yamaha XS400 Forum at XS400.com!
Yamaha xs650
xs650, xs, 650, forum, links, chopper, custom, yamaha, parts, forum, info,
information, bb, bulletin board, XS650 650Rider, Free Unrestricted xs650
forum, Personal photo albums, Post images in Forum, News columns, Daily blog,
Links, Event calendar, Information for Yamaha XS650
Interactive software released under GNU GPL,
Code Credits,
Privacy Policy
|
|