|
Search 650Rider.com and XS650.com using Google!
|
 | |
|
|
|
| xs650 > > Custom Work: Chop, Bob, Cafe and Flattracker - Streettracker > > Cafe Racer > > The $100 Wonder: Cafe build.... |
|---|
| Author |
Message |
pumps
650Rider Supporter

Joined: May 29, 2007
Posts: 1993
Location: Kansas City, Missouri, U.S.A.- 1977 XS650 "D" Standard
|
 Posted: March 29, 2008, 12:34 am Post subject: Re: The $100 Wonder: Cafe build.... Posted: March 29, 2008, 12:34 am Post subject: Re: The $100 Wonder: Cafe build.... |
|
This doesn't show the Euro model which had the large headlight from what I understand.
www.cyclechaos.com/wik.../Xv920.jpg
Here it is the headlight still doesn't look as big as I remember. Maybe I'm getting old? Nice clean looking bike though.
www.vjmog.com/ftopict-743.html
_________________
You don't HAVE to be crazy to run into burning buildings, but it HELPS!
On an XS you won't pass yourself on the road everyday. 
My Bikes |
|
| Back to top |
|
 |
drifter
650Rider Supporter

Joined: Mar 25, 2008
Posts: 469
Location: Wilmington NC
|
| Posted: March 29, 2008, 12:40 am Post subject: Re: The $100 Wonder: Cafe build.... |
|
As far as I know the 8 inch Seca light was the largest that Yamaha ran stock. It is the same on as on the XV920R and the XJ650R. Yhe Maxims and Viragos used smaller lights. Only the European styles R models used the big light. I want to find one for my XS. If you want night lighting, the big Seca light is definately the way to go!
_________________
Drifter
Ace of Clubs
1978 XS650SE
"Never mind the track. The track is for punks. We are Road People. We are Cafe Racers." Hunter S. Thompson |
|
| Back to top |
|
|
scotts
Full Member


Joined: Apr 03, 2007
Posts: 689
Location: Rock Hill, SC
|
| Posted: March 30, 2008, 5:34 pm Post subject: Re: The $100 Wonder: Cafe build.... |
|
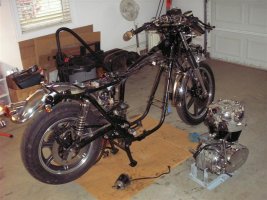
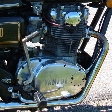
Well, since the $100 Wonder needs a top end inspection to stop an annoying leak (which has gotten better, BTW.....now that there are OTHER issues to deal with!) and to find the cause of the top-end noise, we pulled the engine out this weekend.
It wasn't hard at all. I did a little prep work yesterday and my girlfriend helped me today. Had it out in no time.
| Description: |
|
| Filesize: |
85.2 KB |
| Viewed: |
297 Time(s) |
|
|
|
| Back to top |
|
|
scotts
Full Member
Joined: Apr 03, 2007
Posts: 689
Location: Rock Hill, SC
|
| Posted: March 30, 2008, 5:35 pm Post subject: Re: The $100 Wonder: Cafe build.... |
|
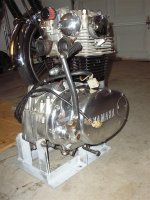
A buddy at work built me an engine stand a couple of months ago, using the specs on 650motorcycles.com. Worked out pretty well.
| Description: |
|
| Filesize: |
55.11 KB |
| Viewed: |
293 Time(s) |
|
| Description: |
|
| Filesize: |
51.77 KB |
| Viewed: |
297 Time(s) |
|
|
|
| Back to top |
|
|
scotts
Full Member
Joined: Apr 03, 2007
Posts: 689
Location: Rock Hill, SC
|
| Posted: March 30, 2008, 5:36 pm Post subject: Re: The $100 Wonder: Cafe build.... |
|
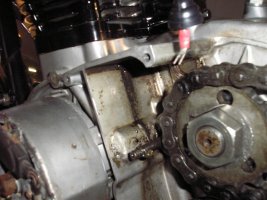
I also plan to take this opportunity to fix a small drip at the starter. It's the O-ring where the starter fits into the engine case.
Also, can anyone tell me what this oil inside the left engine cover is from? (The vertical line on the engine case, just in front of the clutch pushrod)
I've replaced the clutch pushrod and output shaft seals. They're both still dry. I see no oil at the gear selector area. It looks like the chain is slinging it, but where would it be coming from?
Think maybe the P.O. over-greased the chain? It's only at this spot and on the whatchamacallit that the chain rides on. Every now and then, I'll get a drip from the left side...this is all I see when I have the cover off.
| Description: |
|
| Filesize: |
67.61 KB |
| Viewed: |
367 Time(s) |
|
|
|
| Back to top |
|
|
scotts
Full Member
Joined: Apr 03, 2007
Posts: 689
Location: Rock Hill, SC
|
| Posted: March 30, 2008, 5:44 pm Post subject: Re: The $100 Wonder: Cafe build.... |
|
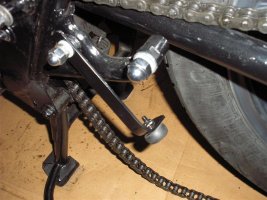
And for wesleyonoel, here's a pic of the centerstand stop we made. Just took a piece of flat iron, cut it to length, put a 90 degree bend on one end and a slot on the other. I drilled a hole and bolted on an old rubber stopper I had...I think it's from a ball-joint shock!
I copied this set-up from a similar deal on the Commando system that MieksXS sells.
| Description: |
|
| Filesize: |
78.66 KB |
| Viewed: |
298 Time(s) |
|
|
|
| Back to top |
|
|
scotts
Full Member
Joined: Apr 03, 2007
Posts: 689
Location: Rock Hill, SC
|
| Posted: April 25, 2008, 11:03 am Post subject: Re: The $100 Wonder: Cafe build.... |
|
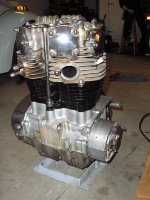
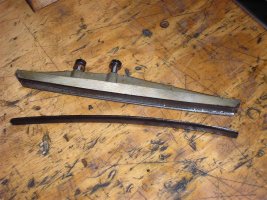
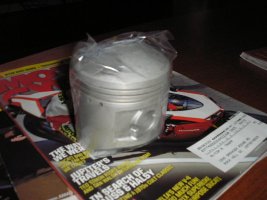
Finally got around to tearing into the motor. Here's the culprit of the top-end noise.
The cam chain is tight and looks good. However, the cylinders show some wear, so I ordered a pair of 0.50mm over pistons and new rings.
| Description: |
|
| Filesize: |
104.58 KB |
| Viewed: |
288 Time(s) |
|
|
|
| Back to top |
|
|
scotts
Full Member
Joined: Apr 03, 2007
Posts: 689
Location: Rock Hill, SC
|
| Posted: April 25, 2008, 11:05 am Post subject: Re: The $100 Wonder: Cafe build.... |
|
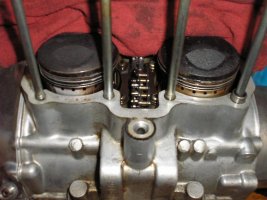
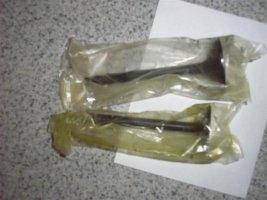
I'll also have to replace the valves and adjusters. I guess someone didn't keep up with the valve adjustments and the adjusters mushroomed and/or pitted and chewed up the valve stems.
At least now I'll have a basically new top-end when I'm done.
| Description: |
|
| Filesize: |
69.42 KB |
| Viewed: |
280 Time(s) |
|
| Description: |
|
| Filesize: |
92.65 KB |
| Viewed: |
281 Time(s) |

|
|
|
| Back to top |
|
|
5twins
Full Member
Joined: Aug 05, 2006
Posts: 1616
|
| Posted: April 25, 2008, 12:38 pm Post subject: Re: The $100 Wonder: Cafe build.... |
|
New O.E.M. replacement screws will pit in the same manner eventually. It's a poor design with the rounded head of the screw contacting the valve stem top in just one tiny spot. Consider the VW elephant's foot adjuster screws instead.
Depending how bad the valve tops are, you may be able to stone the high spots down and re-use them. That VW adjusting screw contacts the total top surface of the valve stem so a dimple in the middle from the old screws won't hurt anything.
|
|
| Back to top |
|
|
scotts
Full Member
Joined: Apr 03, 2007
Posts: 689
Location: Rock Hill, SC
|
| Posted: April 25, 2008, 1:42 pm Post subject: Re: The $100 Wonder: Cafe build.... |
|
The tops of the valves are BAD...cratered and actually missing material. I'll get pics next time I'm up at the shop.
I considered the VW style conversion, but that entails cutting the rocker arm. For $28 I can get new adjusters....they oughta last me many years with my driving style.
|
|
| Back to top |
|
|
dpmphoto
Full Member

Joined: Apr 18, 2007
Posts: 485
Location: syracuse NY
|
| Posted: April 30, 2008, 1:13 am Post subject: Re: The $100 Wonder: Cafe build.... |
|
| Looking good, was wondering how you like the omar seat, was thinking of buying one ARE they worth the $275?
|
|
| Back to top |
|
|
scotts
Full Member
Joined: Apr 03, 2007
Posts: 689
Location: Rock Hill, SC
|
| Posted: May 1, 2008, 9:04 am Post subject: Re: The $100 Wonder: Cafe build.... |
|
In my opinion, the Omars seat is worth every penny. It is very sturdy, thick fiberglass and is a (near) bolt on deal with the stock tank. I had to fab up a different mount since the XS750 tank pushed everything back a bit.
The seat pad is also very nice but a tad firm. But, you don't have to make/fab up your own upholstered seat. All in all, I recommend it.
|
|
| Back to top |
|
|
scotts
Full Member
Joined: Apr 03, 2007
Posts: 689
Location: Rock Hill, SC
|
| Posted: May 10, 2008, 3:16 pm Post subject: Re: The $100 Wonder: Cafe build.... |
|
Got the new parts in and dropped off at the local shop. I went ahead and ordered new adjusters for the vlaves, too. I didn't want the worn adjusters to chew up the tips of my new valves. Now, I'm just waiting on the shop to finish up so I can get the motor back in the frame.
| Description: |
|
| Filesize: |
58.46 KB |
| Viewed: |
277 Time(s) |
|
| Description: |
|
| Filesize: |
52.27 KB |
| Viewed: |
262 Time(s) |
|
|
|
| Back to top |
|
|
scotts
Full Member
Joined: Apr 03, 2007
Posts: 689
Location: Rock Hill, SC
|
| Posted: May 10, 2008, 3:17 pm Post subject: Re: The $100 Wonder: Cafe build.... |
|
I didn't want THIS to happen again with my brand new parts.
| Description: |
|
| Filesize: |
48.38 KB |
| Viewed: |
299 Time(s) |

|
|
|
| Back to top |
|
|
xsjohn
Full Member

Joined: Jul 30, 2006
Posts: 5857
Location: North Carolina USSA
|
| Posted: May 10, 2008, 3:46 pm Post subject: Re: The $100 Wonder: Cafe build.... |
|
| Elephants feet or intake valve oiling system .......and setting them less that .004 will speed up the destruction.....luckily with my intake oiling system I can set the intakes a 5 thou and they are quiet and that advances the valve timimg some and makes mine pull even stronger in the lows and midrange.........xsjohn
|
|
| Back to top |
|
|
scotts
Full Member
Joined: Apr 03, 2007
Posts: 689
Location: Rock Hill, SC
|
| Posted: June 4, 2008, 4:47 pm Post subject: Re: The $100 Wonder: Cafe build.... |
|
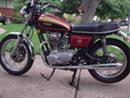
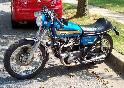
IT LIVES! Again....
After a top-end refresh (new cam chain guide, 2nd overbore pistons/rings, new valves and adjusters and some new seals all around), and some tweaking of the carbs (Thanks, PamcoPete for the mixture screws), SHE LIVES!
She fired right up, some very minor twiddling to the idle and a clutch adjustment (that still needs a little tweaking), I was able to ride her around the neighborhood. No leaks, no popping or backfiring, plenty of power...at least in 1-2-3 gear at low rpm's around the neighborhood.
Now all I have to do is make some final adjustments and tuning, get it registered and take it to the local Hot Rod shop so he can make me some custom side covers. I'll post new pics as soon as she's done...YAY
|
|
| Back to top |
|
|
TeeCat
Full Member
Joined: Aug 21, 2007
Posts: 1120
Location: Central Maryland
|
| Posted: June 5, 2008, 12:52 pm Post subject: Re: The $100 Wonder: Cafe build.... |
|
scotts... NICE job! You have got me thinking of some Commandos for my '73. Do you like the way they sound? And do you think they'd look too long on my bike? 5twins was saying that the shorties I was eyeballing are just too loud.
Sweet bike!
TC
|
|
| Back to top |
|
|
scotts
Full Member
Joined: Apr 03, 2007
Posts: 689
Location: Rock Hill, SC
|
| Posted: June 5, 2008, 12:59 pm Post subject: Re: The $100 Wonder: Cafe build.... |
|
I haver Commandos on the '83 and Dunstall replicas on the cafe' racer. The Commandos have a little deeper tone and, supposedly, are dyno proven to add a few HP.
The Dunstall sound fine to me and I'm told the bike is pretty quiet going down the road.
|
|
| Back to top |
|
|
funranger
650Rider Supporter

Joined: Feb 18, 2005
Posts: 18
|
| Posted: June 18, 2008, 9:09 pm Post subject: Re: The $100 Wonder: Cafe build.... |
|
okokok lets see the side covers
_________________
To the victor go the spoiles |
|
| Back to top |
|
|
scotts
Full Member
Joined: Apr 03, 2007
Posts: 689
Location: Rock Hill, SC
|
| Posted: June 19, 2008, 8:18 am Post subject: Re: The $100 Wonder: Cafe build.... |
|
| The bike's at the shop getting them hand-made RIGHT NOW! Hopefully, I'll get it back this weekend and get some new pics.
|
|
| Back to top |
|
|
TheDude
Full Member

Joined: Feb 15, 2008
Posts: 152
Location: Arcata, CA
|
| Posted: June 19, 2008, 6:02 pm Post subject: Re: The $100 Wonder: Cafe build.... |
|
scotts, those Mike's headpipes you have. Are they the XS Performance Part #07-0757? They look great, but I'm looking for more up sweep in the rear (at least as much as the stock system on my 78E). Did you modify them to be that straight?
thanks
_________________
'78 XS650E Standard |
|
| Back to top |
|
|
scotts
Full Member
Joined: Apr 03, 2007
Posts: 689
Location: Rock Hill, SC
|
| Posted: June 19, 2008, 6:40 pm Post subject: Re: The $100 Wonder: Cafe build.... |
|
| Yes, that's the part # at Mikes. No, I did not modify them at all.
|
|
| Back to top |
|
|
scotts
Full Member
Joined: Apr 03, 2007
Posts: 689
Location: Rock Hill, SC
|
| Posted: June 27, 2008, 6:34 pm Post subject: Re: The $100 Wonder: Cafe build.... |
|
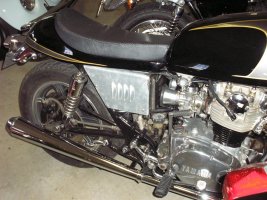
I picked up the bike from my friend Busters shop today. He hand fabbed these side covers from 18 and 20ga steel. It's hard to see in the pics, but there's a piece on the front of the battery with louvers as well.
I plan on having these painted in gloss black to match the tank and seat. I'd like to do some pinstriping but I'm undecided on just how to do it right now. Maybe just a few small gold stripes on each louver? Or, I thought about a "C" shaped stripe, sorta like on the early XS side covers.
I wonder if the chrome trim from an early side cover would fit? Hmmm.....(scratches chin).
| Description: |
|
| Filesize: |
148.11 KB |
| Viewed: |
323 Time(s) |
|
| Description: |
|
| Filesize: |
152.78 KB |
| Viewed: |
281 Time(s) |

|
| Description: |
|
| Filesize: |
118.46 KB |
| Viewed: |
286 Time(s) |

|
|
|
| Back to top |
|
|
xsleo
Full Member

Joined: Oct 28, 2007
Posts: 1528
Location: Earlville NY
|
| Posted: June 28, 2008, 10:24 pm Post subject: Re: The $100 Wonder: Cafe build.... |
|
look good, if you can get it to blend in with the stripe and gray on the rear cowling under the seat and flow forward curving just in front of the louvers ,back around to the rear bottom. to tie in with the stripe and gray on the tank.
_________________
"You live more in five minutes on a bike than most people do in there whole life"
'75 XS650B with a 79 dual disc front end, rear disk brake, Chrysler reg, Radio Shack rect, LED tail/ brake and turn signals. |
|
| Back to top |
|
|
|
|
You cannot post new topics in this forum
You cannot reply to topics in this forum
You cannot edit your posts in this forum
You cannot delete your posts in this forum
You cannot vote in polls in this forum
You cannot attach files in this forum
You can download files in this forum
|
|
|
|
| |
Check out the new Honda CB750 Forum at CB750.com! A site dedicated to the great Honda SOHC and DOHC CB750.
Check out the new Yamaha XS400 Forum at XS400.com!
Yamaha xs650
xs650, xs, 650, forum, links, chopper, custom, yamaha, parts, forum, info,
information, bb, bulletin board, XS650 650Rider, Free Unrestricted xs650
forum, Personal photo albums, Post images in Forum, News columns, Daily blog,
Links, Event calendar, Information for Yamaha XS650
Interactive software released under GNU GPL,
Code Credits,
Privacy Policy
|