|
Search 650Rider.com and XS650.com using Google!
|
 | |
|
|
|
| xs650 > > Motorcycle Systems > > Engine > > Possible successful left crank seal replacement... |
|---|
Possible successful left crank seal replacement...
|
| Author |
Message |
TeeCat
Full Member

Joined: Aug 21, 2007
Posts: 1120
Location: Central Maryland
|
 Posted: July 21, 2008, 8:49 am Post subject: Possible successful left crank seal replacement... Posted: July 21, 2008, 8:49 am Post subject: Possible successful left crank seal replacement... |
|
All -
I take a lot from this community, so I try to contribute what little I can, as I can. I don't want to make any rash pronouncements until I ride the bike for a bit, but I fired it up and let it idle - with a few revs - to op temp after having installed a new left crank seal (behind the alternator). I hope this works because not only might it correct the second of two annoying leaks on my '73 TX, bit it may also demonstrate that it's not absolutely necessary to split the case to install a crank seal. Whereas the original seals have a symmetrical half-round ridge around the outer circumference that would be difficult to get past the machined port, the new seals have a ridge that's "ramped" from the back, and it's less inclined to tear, especially since the crank port rim seems to have a slight chamfer.
After letting the bike run for a little bit, there are currently no signs of leakage. The original seal had likely dried and shrunk, causing leakage from between the seal and the shaft. I'll continue to monitor it, but I'm very hopeful that we can add this seal to the list of ones that can be replaced without a teardown.
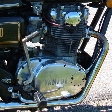
After the installation:
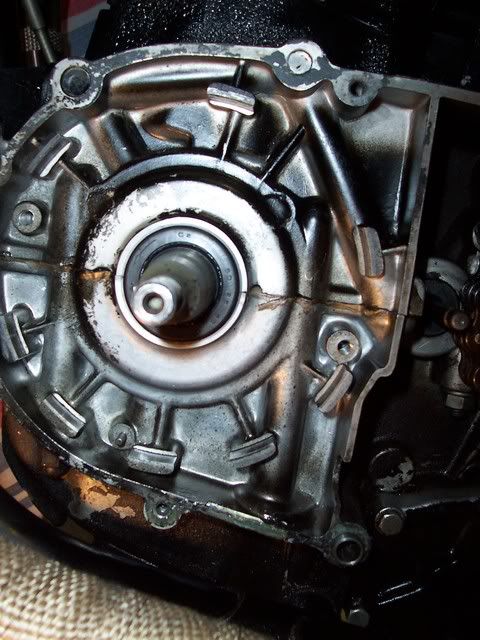
I decided that about a mm of seal protrusion was consistent with other seal installations I've seen, and since the seal is undeformed and square to the port, and seems to be all the way home, I didn't force it by hitting it any more and risk deforming it or tearing the rim. As it is, just a little excess Yamabond came out of the perimeter, but no elastomer (seal material) at all.
Thanks to all who coached me on stator/rotor removal.
TC
|
|
| Back to top |
|
 |
Cooltouch
Full Member

Joined: Jan 07, 2007
Posts: 568
Location: Houston, Texas
|
| Posted: July 21, 2008, 9:01 am Post subject: Re: Possible successful left crank seal replacement... |
|
Thanks for the update, TC. Glad to know this repair can be done, thanks, it would appear, to an improved seal design.
Best,
ichael
_________________
Triple Tuning Forks Rule!
'81SH, '80SG, '78E, '77D |
|
| Back to top |
|
|
pumps
650Rider Supporter

Joined: May 29, 2007
Posts: 1993
Location: Kansas City, Missouri, U.S.A.- 1977 XS650 "D" Standard
|
| Posted: July 21, 2008, 10:26 am Post subject: Re: Possible successful left crank seal replacement... |
|
Now is that just the black rubber part we see? Thats all that is the seal? What method did you remove the old one and how did you install the new one to fit -by that I mean what tools. Cost of the seal? Where did you get it? Any special tools? I thought somewhere I saw you mention a puller to remove the alternator....How long did it take? Minus the beer drinking-:)
The pictures are very good.Mine never look that clear....
_________________
You don't HAVE to be crazy to run into burning buildings, but it HELPS!
On an XS you won't pass yourself on the road everyday. 
My Bikes |
|
| Back to top |
|
|
TeeCat
Full Member
Joined: Aug 21, 2007
Posts: 1120
Location: Central Maryland
|
| Posted: July 21, 2008, 11:03 am Post subject: Re: Possible successful left crank seal replacement... |
|
| pumps wrote: |
Now is that just the black rubber part we see? Thats all that is the seal? What method did you remove the old one and how did you install the new one to fit -by that I mean what tools. Cost of the seal? Where did you get it? Any special tools? I thought somewhere I saw you mention a puller to remove the alternator....How long did it take? Minus the beer drinking-:)
The pictures are very good.Mine never look that clear.... |
Guys, I suppose this might merit a procedural write up, but in the interim, I'll do a little primer (I'm assuming for the moment that my efforts have paid off). The seal (the black elastomer ring around the crankshaft cone) is available from MikesXS. They're not cheap, but buy more than one in case you booger the first one.
You'll need the seal, a rotor puller (about $10.00 from Mike's) some Yamabond 1104, a common seal puller from any auto parts store, a tub of fitting grease, an approximately 6" long piece of pvc pipe that's 1.5" in outer diameter (approximately the same diamater as the seal), a moderately heavy ball pean or machinist's hammer, phillips and bladed screwdrivers, and the requisite tools (including torque wrenches) to pull the left cover and access the alternator.
Once you pull the left cover, you'll see the alternator cover that can be removed via two screws... you might need a hand held impact driver to crack them loose. Pull the cover away from the mounting - the brush assembly will come with it. Lay it aside, still connected to the harness.
Brace the rotor (I used a tow strap) to keep it from turning counterclockwise as you remove the rotor lock nut. Thread the body of the puller onto the rotor as far as it will go, then thread the puller's post into the body. Use a suitable wrench to keep the body/crank from turning clockwise as you apply torque (clockwise) to the post with another wrench. The rotor should pop off; no need to be shy with it. Don't lose the woodruff key, though mine was attached to the cone shaft.
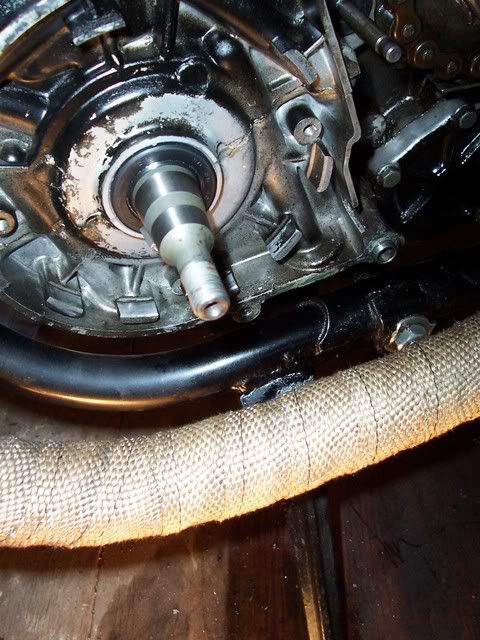
You'll see the seal now. A leak will amost certainly be evidenced by a bead of oil at 6:00, and the case nearby will show traces of oil. You'll almost certainly have had dripping from the rearward portion of the alternator enclosure by the time you even decide to do this repair.
As with other oil seals, this one is made of an elastomer that's molded over a metal ring. The inner circumference is more pliable than the outer; the former rides against the shaft and likely does most of the actual sealing. When the seals dry and shrink, the softer areas evidently shrink more, and hence the leak between the seal and shaft.
Remove the seal with the longer hook of your puller; you may have to grind the thickness of the hook to about 2 mm to get it between the shaft and the seal. Get a firm purchase behind the seal frame. Do not scratch the shaft or use it for leverage; pry against the front of the opposite end of the seal only. You'll destroy the old seal on the way out... that's okay.
Clean the port and shaft well. The edge may be chamfered already, but do so lightly if it's not, just enough to remove any sharp edges that could tear the new seal.
Grease the shaft and the inner circumference of the seal. Having placed your new seal in the freezer overnight to shrink it, VERY LIGHTLY fingerpaint the outer circumference with Yamabond... not too much, as it's bulky. Start the seal in hollow side first with your thumbs, and lightly begin to tap it into the port with the pvc and hammer. MAKE SURE it goes in square to the port... not canted. You'll feel the back of the seal bottom out when it's home... there will likely be about 1 mm of seal just proud of the port. As long as it's uniformly proud, do not bang on it or force it more, as you may deform it. Resist the temptation to strike the seal with the hammer itself, or with any other object, especially a metal one. Work patiently with the pvc, around the outer perimeter of the seal only.
With your finger or a rag, remove any excess sealant from the perimeter and face of the seal.
Reverse the disassembly procedure. Make sure your brushes are not pinched behind the alternator stator when you reinstall it. Observe all torque ratings for fasteners.
There are likely some holes in this, so let me know of more questions, or maybe others with experience can add bits.
Again, I'mm hoping I continue to stay dry, and am describing this procedure with reasonable confidence that I will.
TC
Last edited by TeeCat on July 21, 2008, 12:33 pm; edited 3 times in total |
|
| Back to top |
|
|
hal0tw0
650Rider Supporter

Joined: Jul 27, 2007
Posts: 94
Location: Richmond VA
|
| Posted: July 21, 2008, 12:15 pm Post subject: Re: Possible successful left crank seal replacement... |
|
Good info. I just found leak on the left side I need to investigate. Could be the clutch rod or this seal here leaking. Thanks!
_________________
If left isnt right, right is all thats left.... |
|
| Back to top |
|
|
pumps
650Rider Supporter
Joined: May 29, 2007
Posts: 1993
Location: Kansas City, Missouri, U.S.A.- 1977 XS650 "D" Standard
|
| Posted: July 21, 2008, 2:56 pm Post subject: Re: Possible successful left crank seal replacement... |
|
Very informative!
_________________
You don't HAVE to be crazy to run into burning buildings, but it HELPS!
On an XS you won't pass yourself on the road everyday.
My Bikes |
|
| Back to top |
|
|
raftercliff
650Rider Supporter

Joined: Jun 10, 2008
Posts: 58
Location: West Fargo, ND
|
| Posted: July 21, 2008, 6:38 pm Post subject: Re: Possible successful left crank seal replacement... |
|
Thank you. This will be a big time/money/effort saver for many of us in the future.
_________________
Make no little plans. They have no magic to stir men's blood. - Daniel Burnham
78 XS650SE |
|
| Back to top |
|
|
jimmer
650Rider Supporter

Joined: Apr 20, 2006
Posts: 305
Location: NB, Canada
|
| Posted: July 21, 2008, 9:17 pm Post subject: Re: Possible successful left crank seal replacement... |
|
| Nice writeup TeeCat ... hope it holds up ... if not you can do it blindfolded next time!
|
|
| Back to top |
|
|
pumps
650Rider Supporter
Joined: May 29, 2007
Posts: 1993
Location: Kansas City, Missouri, U.S.A.- 1977 XS650 "D" Standard
|
| Posted: July 21, 2008, 9:38 pm Post subject: Re: Possible successful left crank seal replacement... |
|
We'll all just ride over to your house and get in line........;)
_________________
You don't HAVE to be crazy to run into burning buildings, but it HELPS!
On an XS you won't pass yourself on the road everyday.
My Bikes |
|
| Back to top |
|
|
weekendrider
Support Staff


Joined: Apr 20, 2007
Posts: 1284
Location: SW MO 2x83SK 79F 78E
|
| Posted: July 21, 2008, 10:45 pm Post subject: Re: Possible successful left crank seal replacement... |
|
Nice job TeeCat. My moneys on it holding if you'll give the 1104 alittle while to set up.
_________________
geocached @ N 37° 26.917', W 093 11.724, elev. 1148' |
|
| Back to top |
|
|
5twins
Full Member
Joined: Aug 05, 2006
Posts: 1616
|
| Posted: July 22, 2008, 12:58 am Post subject: Re: Possible successful left crank seal replacement... |
|
Yes, very good write-up, TC, you're really gettin' the hang of this bike work.
All I'm going to add is this tip I got years ago from an old mechanic. This applies to all seal replacements and since I've been using it, I've had near 100% success with them. Buff the shaft where the seal lip rides with a Scotch Brite pad. This doesn't remove any material but simply smooths over the surface, removing most of that shiny ring where the old seal lip was riding and giving a fresh surface for the new seal lip to work on.
|
|
| Back to top |
|
|
raftercliff
650Rider Supporter
Joined: Jun 10, 2008
Posts: 58
Location: West Fargo, ND
|
| Posted: July 22, 2008, 1:03 am Post subject: Re: Possible successful left crank seal replacement... |
|
Thanks 5twins. That is why I like this group. So many gurus that share the why along with the how.
_________________
Make no little plans. They have no magic to stir men's blood. - Daniel Burnham
78 XS650SE |
|
| Back to top |
|
|
650skull
Support Staff
Joined: Jul 19, 2007
Posts: 1186
|
| Posted: July 22, 2008, 2:31 am Post subject: Re: Possible successful left crank seal replacement... |
|
Thanks, good write up and easy to understand.
Lx.
|
|
| Back to top |
|
|
jimmythetrucker
Full Member
Joined: Mar 12, 2008
Posts: 1283
|
| Posted: July 22, 2008, 6:04 am Post subject: Re: Possible successful left crank seal replacement... |
|
In different applications, I've seen on occasion that the lip of a seal will actually wear a groove in the sealing surface of a shaft over time. Last year, for example, I encountered that problem when replacing a pinion-shaft seal on an S-10 pickup: the lip of the old seal had worn a groove in the pinion yoke; the new seal couldn't possibly work unless I bought a new pinion yoke ($120 at the Chevy dealer). Alternative was to replace the entire rear end ($200 at the salvage yard).
A visit to the machine shop saved me. One of the machinists cut a ring of .030" shimstock to fit over the spline shaft, between the pinion yoke and the inner race of the outer pinion bearing. The shim effectively lengthened the pinion yoke by .030", moving the damaged portion of the pinion-yoke sealing surface outward and allowing the new seal to work against a smooth, undamaged portion of the pinion yoke.
It seems a fella might get away with something similar here -- if the sealing surface of the crankshaft is damaged, a machinist could cut a shim ring to fit into the seal cup, between the new seal and the crankcase. It would force the seal outward, allowing the lip of the seal to work against an unmarred surface of the crankshaft.
Whether or not it would work, of course, depends on a couple of factors: Is the seal cup deep enough to support the new seal with the shim in place behind it? With respect to the rotor, the shim would make the new seal effectively .030" thicker. With the rotor in place, is there room between the seal and the rotor to allow that?
I don't know the answers to those questions, but the low price of shimstock encourages me to try that solution if ever I encounter a crankshaft with a marred sealing surface.
|
|
| Back to top |
|
|
TeeCat
Full Member
Joined: Aug 21, 2007
Posts: 1120
Location: Central Maryland
|
| Posted: July 22, 2008, 7:03 am Post subject: Re: Possible successful left crank seal replacement... |
|
Thank you, guys. I hope this works and we can add it to the growing compendium of successful procedures here.
5twins... good suggestion! You know, I had pad in hand, but was amazed and relieved to see that there was actually no marring of the crank from the seal lip! But I buffed it a little with the pad and cleaned it anyway.
jimmy... this is a great suggestion. I was worried initially that I might have that issue, but fortunately, what I was actually seeing was the innermost of the two rings "beaded" into the crank cone that "grab" the mating rotor surface. But your suggestion may save a hide or two.
I'll have to go on some runs, but I'm hopeful and confident in this repair. I'm finally able to contribute, too, instead of just receive.
TC
|
|
| Back to top |
|
|
Cooltouch
Full Member
Joined: Jan 07, 2007
Posts: 568
Location: Houston, Texas
|
| Posted: July 22, 2008, 12:32 pm Post subject: Re: Possible successful left crank seal replacement... |
|
Jimmy,
Your suggestion probably won't work for this application because the seal has a prodruding ring along its circumference that fits into a groove cut into the cases. So it can't be repositioned.
I suspect the reason why a groove was worn into your pinion shaft wasn't because of the seal itself, but was because of foreign grit collecting against the seal, acting as an abrasive media on the shaft. The same thing can happen with the rotor shaft on the XS I'm thinking, if one doesn't keep that left cover gasket in good repair.
Best,
ichael
_________________
Triple Tuning Forks Rule!
'81SH, '80SG, '78E, '77D |
|
| Back to top |
|
|
jimmythetrucker
Full Member
Joined: Mar 12, 2008
Posts: 1283
|
| Posted: July 22, 2008, 2:08 pm Post subject: Re: Possible successful left crank seal replacement... |
|
| Cooltouch wrote: |
Jimmy,
Your suggestion probably won't work for this application because the seal has a prodruding ring along its circumference that fits into a groove cut into the cases. So it can't be repositioned.
I suspect the reason why a groove was worn into your pinion shaft wasn't because of the seal itself, but was because of foreign grit collecting against the seal, acting as an abrasive media on the shaft. The same thing can happen with the rotor shaft on the XS I'm thinking, if one doesn't keep that left cover gasket in good repair.
Best,
ichael |
In a fit of desperation (I don't WANNA split this effin case!) I might take a grinder to that protruding ring and make it disappear. Then I could put the shim in the socket, paint the OD of the seal with silicone sealant or weatherstrip cement, and install my customized seal. When the glue sets up, I'd go for a ride and try it, anyway. Hell! You got nothin' to lose in any event: you can still split the case if it doesn't work.
I suspect you're right about the groove in the sealing surface of my pinion yoke. But the "why" of the thing doesn't matter once the groove is cut. The old thing had 270K miles on it, so I didn't resent the fact that the groove was there. I just got tired of seein' grease on he driveway. I effin' HATE s*** that leaks! Goddam British junk! Goddam Milwaukee crud, Goddam s*** hell goddam anyway! GRRRR! Leaks. Gaaaaaaaaah!
|
|
| Back to top |
|
|
yamaman
Support Staff
Joined: Jan 04, 2007
Posts: 1638
Location: Perth Western Australia
|
| Posted: July 23, 2008, 2:23 am Post subject: Re: Possible successful left crank seal replacement... |
|
[quote="TeeCat"]
| pumps wrote: |
Brace the rotor (I used a tow strap) to keep it from turning counterclockwise as you remove the rotor lock nut. Thread the body of the puller onto the rotor as far as it will go, then thread the puller's post into the body. Use a suitable wrench to keep the body/crank from turning clockwise as you apply torque (clockwise) to the post with another wrench. The rotor should pop off; no need to be shy with it. Don't lose the woodruff key, though mine was attached to the cone shaft.
TC |
If you are fortunate enough to have a impact/ rattle gun, one pull of the trigger and the nut is off, you can also use the gun on the puller- makes easy work of it.
Top work TC, I too have a leaking seal so am looking forward to your next instalment, cheers
_________________
Its not enough to have an aim in life, you have to pull the trigger! |
|
| Back to top |
|
|
TeeCat
Full Member
Joined: Aug 21, 2007
Posts: 1120
Location: Central Maryland
|
| Posted: August 5, 2008, 1:37 pm Post subject: Re: Possible successful left crank seal replacement... |
|
Well, as a follow-up to this post - mainly for yamaman - I still have a leak from this seal, but my buddy Chris and I don't think it's because of a faulty seal or botched installation. From inspecting the old seal, he noticed that the micro grooves on the inner sealing surface (against the crank spindle, which is not galled or worn) seem to be more worn on what would be the top side of the sealing surface than on the bottom. The motor doesn't make any odd noises, and we find it hard to believe that an 18,000 mile motor would have significant runout in the crank, but I need to see if the cam chain is too tight, possibly egging the seal. Seems too simple, but I'd better consider it.
eanwhile, I want to be able to ride the bike some this season. So, if she wants to drool, I might give her a bib until I can sort this out; I'm thinking of using a slender, horizontally mounted (behind the sidestand) stainless catch can to collect any oil droplets that might otherwise be wind-spattered on my exhaust or frame. You get to decide whether I'm stupid, persistent, creative, or a combo thereof.  But I shall not be denied. But I shall not be denied.
|
|
| Back to top |
|
|
|
|
You cannot post new topics in this forum
You cannot reply to topics in this forum
You cannot edit your posts in this forum
You cannot delete your posts in this forum
You cannot vote in polls in this forum
You cannot attach files in this forum
You cannot download files in this forum
|
|
|
|
| |
Check out the new Honda CB750 Forum at CB750.com! A site dedicated to the great Honda SOHC and DOHC CB750.
Check out the new Yamaha XS400 Forum at XS400.com!
Yamaha xs650
xs650, xs, 650, forum, links, chopper, custom, yamaha, parts, forum, info,
information, bb, bulletin board, XS650 650Rider, Free Unrestricted xs650
forum, Personal photo albums, Post images in Forum, News columns, Daily blog,
Links, Event calendar, Information for Yamaha XS650
Interactive software released under GNU GPL,
Code Credits,
Privacy Policy
|
|